Send email using your DroidScript app

Using DroidScript to send email is not as straightforward as before. Latest versions of android needs a user intervention to successfully send an email. Though app.SendMail() method still exist in the app object of DroidScript, it will open the default Mail app and auto-fill the fields according to the arguments pass in app.SendMail() method.
Luckily, latest DroidScript is equipped with NodeJS runtime. So you can run powerful NodeJS package in your DroidScript app.
NodeMailer
NodeMailer is a Node.js module that allows you to send emails easily using SMTP, OAuth2, or other transport methods. It supports attachments, HTML content, and various email services like Gmail, Outlook, and custom SMTP servers. Refer to its website for more info.
We will use nodemailer module to send or broadcast emails programmatically. To do it, just create a Node app in DroidScript or if you have Native app, use the app.CreateNode component.
In this blog, we will use a Node app type and for our email transporter, we will use Gmail as our host. Please also note that we will be working in the WiFi IDE.
Pre-requisite
- Obtain an App Password from google here. Since google requires a 2-Factor Authentication, we can use this instead. Read more
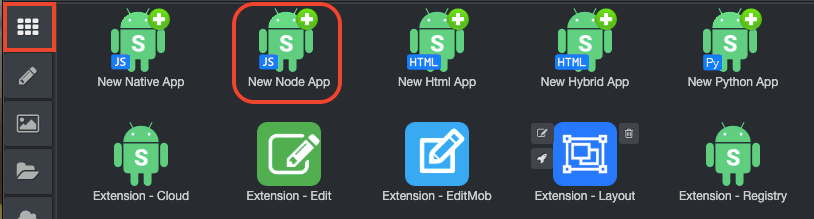
Create a Node App in DroidScript
- In the WiFi IDE homepage, select New Node App.
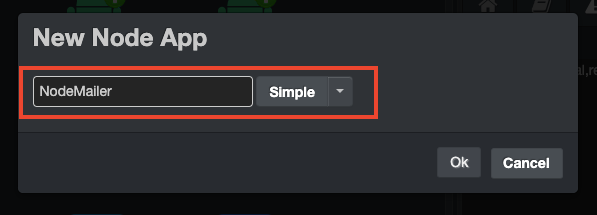
- For the app name, enter
"NodeMailer"and for the type, select"Simple".
Open your new app and then clear everything in NodeMailer.js file and paste the clean code below.
cfg.Node
cfg.Light

function OnStart()
{

}
Install NodeMailer
To install nodemailer, you can use ide.AddModule("nodemailer") at the top of your NodeMailer.js script like this:
cfg.Node
cfg.Light

// install nodemailer package
ide.AddModule("nodemailer")

function OnStart()
{

}
If you find issues installing nodemailer using ide.AddModule(), try to install the package in your desktop and then upload the node_modules folder into your DroidScript app using the File Manager in the WiFi IDE.
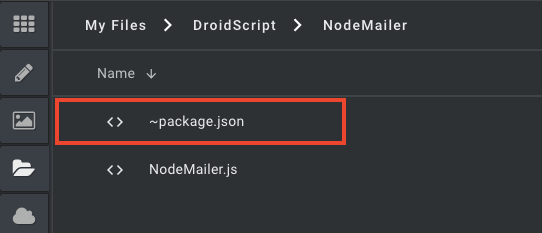
Update ~package.json
In the WiFi IDE, open the File Manager and then navigate to your Project. You should see a file called ~package.json.
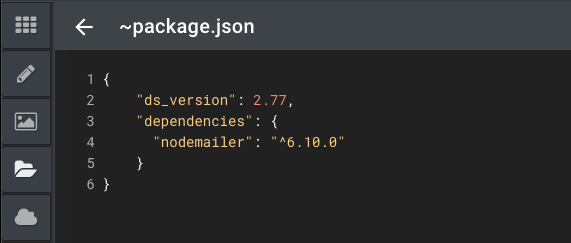
Open this file and add nodemailer as dependency. Make sure you have the correct nodemailer version.
Main script code
Everything is now setup. Paste this code in your NodeMailer.js file. Make sure to change the values for your user, pass and from fields. In the pass field, type your App Password you get from google.
cfg.Node

cfg.Light

const nodemailer = require("nodemailer");

function OnStart()
{
    transporter = nodemailer.createTransport({
        host: "smtp.gmail.com",
        port: 587,
        secure: false, // true for port 465, false for other ports
        auth: {
            user: "sample@gmail.com",
            pass: "gyrwvbjqrcpqdxsb", // google App Password
        },
    });

    sendEmail();
}

async function sendEmail()
{
    // send mail with defined transport object
    const info = await transporter.sendMail({
        from: '"Sample Name" <sample@gmail.com>', // sender address
        to: "foo@example.com, baz@example.com", // list of receivers
        subject: "Hello ✔", // Subject line
        text: "Hello world?", // plain text body
        html: "<b>Hello world?</b>", // html body
    });

    console.log("Message sent: %s", info.messageId);
}
If you follow along, you should have a working DroidScript app that can send or broadcast emails.
If you want to send a file as an attachment, you can do so like this:
cfg.Node

cfg.Light

const nodemailer = require("nodemailer");

function OnStart()
{
    transporter = nodemailer.createTransport({
        host: "smtp.gmail.com",
        port: 587,
        secure: false, // true for port 465, false for other ports
        auth: {
            user: "sample@gmail.com",
            pass: "gyrwvbjqrcpqdxsb", // google App Password
        },
    });

    sendEmail();
}

async function sendEmail()
{
    // send mail with defined transport object
    const info = await transporter.sendMail({
        from: '"Sample Name" <sample@gmail.com>', // sender address
        to: "foo@example.com, baz@example.com", // list of receivers
        subject: "Hello ✔", // Subject line
        text: "Hello world?", // plain text body
        html: "<b>Hello world?</b>", // html body
        attachments: [
            {
                filename: "my-picture.png",
            	content: fs.createReadStream(__dirname+'/Img/my-picture.png')
            }
        ]
    });

    console.log("Message sent: %s", info.messageId);
}
Happy Coding.


Comments ()